Microsoft Outlook is one of the commonly used email communication, especially for official communications. The application is famous for its ease of use, convenient settings and wide range of customisation options. When you use the Outlook app on your device, every mail you send is saved in the Sent Items folder by default. It is usually considered an attractive feature as it allows you to monitor each mail you’ve sent and lets you keep track of your communication with others. However, it can also be an inconvenience at times. Do you want to learn how to stop Outlook from saving emails in the Sent Items folder? Read on.
How to stop Outlook from saving a particular email in the Sent Items folder?

You have the option to stop saving individual emails in Outlook. You can prevent saving a specific email in the sent items folder through the following steps:
Step 1: Open Outlook and type the content of your mail.
Step 2: Select Options from the taskbar and expand by clicking on “More Options”.
Step 3: Click on “Save Sent Items To” and choose the “Do Not Save” option.
Doing so will stop the application from saving the email in Sent Items.
How to stop Outlook from saving all your sent emails?
To prevent storing any sent email in your Sent Items folder, you have three options- Change application settings, modify the group policy or make slight alterations in the registry editor.
1. Change application settings


Here’s how you can stop saving emails by changing the application settings.
Step 1: Open Outlook.
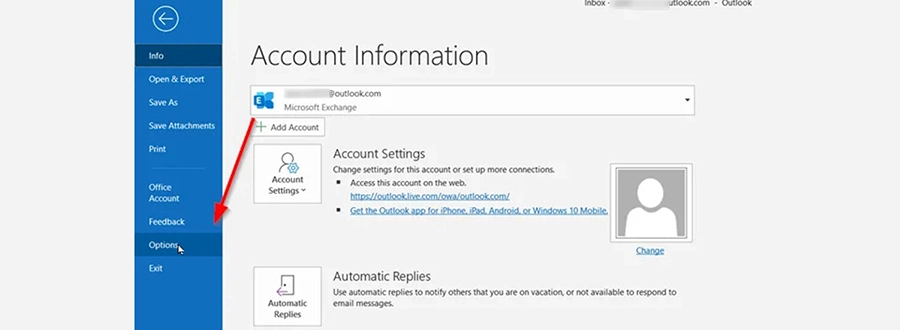
Step 2: Click on “File” in the taskbar.
Step 3: Select “Options”.
Step 4: From the dialogue box, click on the “Mail” tab.
Step 5: Navigate to “Save Messages” in the right pane of the dialogue box.
Step 6: Uncheck the “Save copies of messages in the Sent Items folder” option.
2. Modify group policy
The Group Policy Editor is a unique feature available in Windows 10 Pro, Windows 10 Enterprise and Windows 10 Education. So, make sure you have the required windows edition before proceeding further.
Step 1: Press WIN+R to open the Run window.
Step 2: Type gpedit.msc and click Enter to open the Group Policy Editor (If you get a UAC prompt, choose yes.
Step 3: Click on User Configuration.
Step 4: Navigate to Administrative Templates→ Microsoft Outlook 2016→ Outlook Options→ Preferences→ Email Options
Step 5: Double-click on the “Save copies of messages in Save Items folder” option.
Step 6: Click on “Enabled” and change the settings for the “Save copies of messages in the Sent Items folder” option.
3. Using Registry Editor
By adding a new value to the registry, you can prevent Outlook from saving sent emails. If you’re worried about possibly losing your data, you can first backup your Windows registry and then follow the below steps:
Step 1: Open File from the Outlook app.
Step 2: Click on “Office Account” and select “About Outlook” to know the version of your Outlook app.
Step 3: Press WIN+R to open the Run window.
Step 4: Type Regedit and click Enter to open the Registry Editor (If you get a UAC prompt, choose yes.)
Step 5: Navigate to HKEY_CURRENT_USER\Software\Microsoft\Office\16.0\Outlook\Preferences for Outlook 16, Outlook for Office 365 and Outlook 2019. For Outlook 13, navigate to HKEY_CURRENT_USER\Software\Microsoft\Office\13.0\Outlook\Preferences.
Step 6: Right-click on any blank space on the right pane and select New→ DWORD (32-bit) Value.
Step 7: Give “SaveSent” as the name of DWORD and hit Enter.
Step 8: Double-click on the DWORD file you created.
Step 9: For “Value Data”, enter 0 and click OK. (If you want to start saving your emails in the Sent Items folder again, change this value to 1).
Step 10: Close the registry editor.
This step may seem a bit complicated for some. We advise you to take the help of a professional as you may lose data if not done correctly.
Should you save emails in the sent folder?
We advise saving emails in the sent folder – it is easier to track your communications, especially those done for official purposes. It’s always good to be able to go back and check when and to whom an email was sent and its contents. However, there can be situations where you may decide you don’t need saved copies due to various reasons like –
- Privacy
- Your computer has run out of space
- You share your system where others may see your mails if you forget to logout
- You use a common email with other employees having access to the same email
In such a case, any of the above steps can help you to stop Outlook from saving emails in the sent folder. If you need any assistance with configuring Outlook, don’t hesitate to contact usor email us at helpdesk@computingaustralia.group. Our helpdesk experts in Perth will always be available to give quick solutions for all your IT support queries.
Jargon Buster
Group policy: Group Policy is a centralised OS management feature that controls the settings of user accounts and computer accounts.
Registry editor: The Windows registry editor is a GUI that lets you modify the information, settings and options for software and hardware installed on Windows OS.


