
Short Guide to Taking
Screenshots Easily
Screenshots have become an essential part of our digital lives. Whether you’re collaborating with colleagues, troubleshooting a technical issue, creating a tutorial, or simply saving something for later reference, being able to quickly capture your screen is invaluable.
With Windows 11-the latest version of Microsoft’s operating system-taking screenshots is easier and more versatile than ever before. From classic keyboard shortcuts to feature-rich tools and third-party apps, users have a wide range of options to capture, edit, and share their screens efficiently.
In this guide, we’ll explore the different methods for taking screenshots in Windows 11, from built-in tools like Print Screen and Snipping Tool to advanced third-party applications designed for power users.
Screenshots are more than just pictures-they’re a communication tool. They allow you to:
- Capture errors for IT support.
- Highlight key points in presentations.
- Save web pages or online receipts.
- Share funny or important moments on social media.
- Document training steps or tutorials.
While earlier versions of Windows required more manual work, Windows 11 introduces streamlined methods and improved integration. Let’s go step by step.
Using Print Screen (PrtSc)
The Print Screen key is the most traditional way to capture your display.
- How it works: Pressing the PrtSc (Print Screen) key takes an image of your entire screen.
- Where it goes: The screenshot is saved to the clipboard (not directly to a file).
- Next steps: Open an image editor (like Paint, Photoshop, or even Microsoft Word) and press Ctrl + V to paste. From here, you can crop, edit, or save the image.
Best for quick, full-screen captures when you plan to paste into another program.
The Windows Key + PrtScn Shortcut
If you want a quicker solution that saves directly to a file, this method is perfect.
- Shortcut: Press Windows Key + PrtScn.
- What happens: The screen briefly dims, indicating a capture.
- Where it saves: Go to This PC > Pictures > Screenshots to find the saved PNG file.
Best for users who want full-screen captures automatically saved for later use.
The Snipping Tool

The Snipping Tool is perhaps the most versatile built-in option in Windows 11.
- Shortcut: Press Windows Key + Shift + S.
-
Options: You’ll see a small menu at the top of your screen with multiple snip types:
- Rectangular Snip – Select a box-shaped area.
- Freeform Snip – Draw any shape with your mouse.
- Window Snip – Capture a specific window.
- Full-screen Snip – Capture the entire display.
- Output: The captured screenshot is copied to your clipboard and shown as a preview notification. You can save, edit, or annotate it directly from the Snipping Tool editor.
Best for precise control and quick editing.
The Game Bar
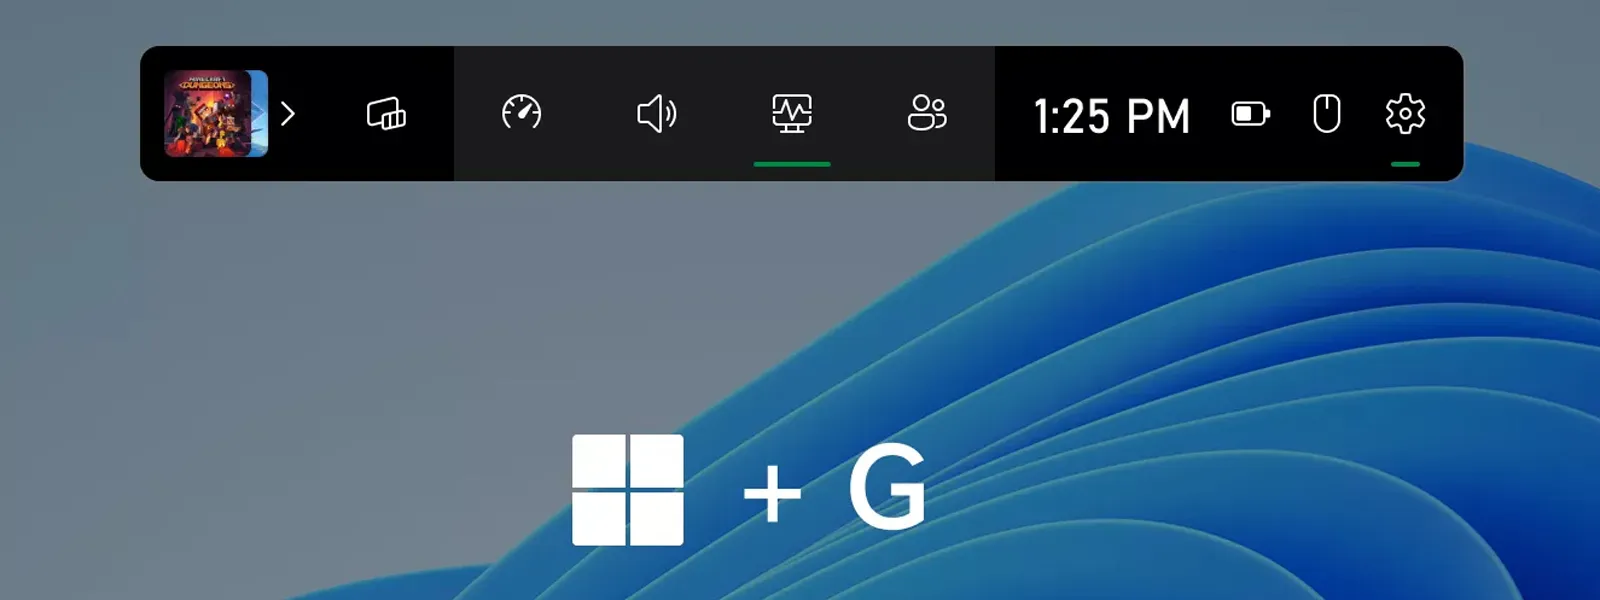
Designed primarily for gamers, the Game Bar also doubles as a useful tool for anyone who needs to capture visuals or record video.
- Shortcut: Press Windows Key + G to open the Game Bar.
- How to capture: Click the camera icon to take a screenshot or the record button to capture video clips.
- Where it saves: Screenshots are saved to This PC > Videos > Captures.
- Stream content.
- Record tutorials or walkthroughs.
- Need to capture time-sensitive in-game moments.
Best for gamers, streamers, and video creators.
Third-Party Screenshot Tools

While Windows 11’s built-in tools cover most use cases, third-party apps offer enhanced functionality like advanced editing, annotations, and direct uploads.
Snagit
- Developer: TechSmith.
- Key Features:
- Advanced editing tools (arrows, highlights, blur).
- Video screen recording.
- Ability to create GIFs.
- Organised screenshot library.
- Best For: Professionals, educators, and businesses needing polished visuals for training, presentations, and documentation.
Greenshot
- Developer: Greenfish Software.
- Key Features:
- Quick and lightweight tool.
- Annotation tools (text, shapes, highlights).
- Direct uploads to platforms like Imgur, Dropbox, and Flickr.
- Best For: Everyday users looking for an efficient, free solution with sharing capabilities.
Lightshot
- Developer: Skillbrains.
- Key Features:
- Simple and intuitive design.
- Quick region selection.
- Online sharing and direct URL generation.
- Lightweight installation.
- Best For: Users who want a minimal, easy-to-use tool without extra complexity.
Best Practices for Screenshot Management
Taking screenshots is easy. Managing them effectively is what makes them powerful.
- Organise folders: Save screenshots into project or client-specific folders for easy access.
- Use naming conventions: Rename files to something meaningful (e.g., “Invoice-ClientName-Jan2026.png”).
- Delete unnecessary captures: Regularly clear old screenshots to avoid clutter.
- Optimise file sizes: Compress large PNGs before sharing to reduce upload times.
- Annotate when necessary: Add arrows, highlights, or notes to clarify what you’re sharing.
Conclusion
Taking screenshots in Windows 11 has never been easier. From simple keyboard shortcuts to advanced third-party apps, there’s a method for everyone-whether you’re a gamer, student, professional, or casual user.
- Use Print Screen and Windows + PrtScn for quick, full-screen captures.
- Use the Snipping Tool for flexibility and editing.
- Use the Game Bar for gaming or video content.
- Consider tools like Snagit, Greenshot, or Lightshot if you need more advanced features.
If you’d like more help choosing the right screenshot tools or need advice on productivity apps, contact the team at Computing Australia.

Blake Parry
FAQ
How do I change the default save location for screenshots?
Open File Explorer and right-click the Screenshots folder (Pictures → Screenshots). Choose Properties → Location → Move and select a new folder. If OneDrive manages Pictures, update the OneDrive Pictures location or disable Pictures backup to change the path.
Can Windows 11 capture the mouse cursor in screenshots?
How can I delay a screenshot to capture menus or tooltips?
Open the Snipping Tool app, click the down arrow next to New, choose a delay (e.g., 3 or 10 seconds), then open the menu or tooltip you want before the capture starts.
How do I screenshot only one monitor on a multi-display setup?
Use Snipping Tool (Windows + Shift + S) and select the region covering the target monitor, or use Window snip to capture a single app window on that display. Some third-party tools can bind hotkeys to a specific monitor.
Can I remap the Print Screen key to open Snipping Tool?
Yes. Go to Settings → Accessibility → Keyboard and enable ‘Use the Print screen button to open Snipping Tool.’ Now pressing PrtScn launches the snipping overlay.


